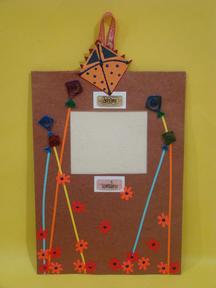
Kite Photoframe
You Will Need:
Fevicryl Liquid Embroidery Glitter - Blue 404, Fevicol MR, A4 Sized Thick Card Papers, Floral Craft Punch, A4 Sized Thin Coloured Papers For Punching, Quilling Strips, Slotted Quilling Tool , Pencil, Scissors, Paper Cutter
Description :
This paper photoframe with kites is a fun craft activity for people of all ages. These cute looking kites are made using basic loose quills and punched flowers. You may hang the frame on the wall or place it on the table.
STEP 1

Take an A4 sized thick card paper in the colour of your choice
We have taken a metallic copper coloured paper
STEP 2
Fold the paper exactly into half as you would do to make the card and then open the fold
Measure a distance of 1 and 1/2 inches from the upper edge of the card and draw a window of 2" x 2" inches in size
Cut out the window using a paper cutter
Close the card and stick the lower and the side open egde of the card using Fevicol MR. Let it dry
The upper egde is left open to insert the photograph
STEP 3
Take 5mm quilling strips in the colours of your choice
Take one strip and roll it on the slotted quilling tool and roll it tight
Remove the tight roll from the quilling tool and let it loosen to make a loose quill
Stick the end using Fevicol MR
You will need 4 to 5 such loose quills to make the kites
Shape the loose coils into square shapes for the kite
STEP 4
To make the triangular base of the kite take a strip and cut it in four equal parts
Make a small loose quill from the cut strip for the triangle
STEP 5
Cut the quilling strips into thin strips of about 2mm for the threads of the kites
STEP 6
Take a small floral punch
Punch few flowers in the colours of your choice
STEP 7
Arrange and stick all the kites, threads and the flowers on the frame in an arrangement of your choice
STEP 8
Loop and stick a ribbon on the back for hanging
You can also make a triangular stand for the frame and keep it on a table top
STEP 9
You may use some decorative card and scrapbook accessories to hightlight your frame further
We have used some small printed plastic pebbles with "dream" and "wonder" prints
STEP 10
A small cutout of a kite outlined in Liquid Embroidery Glitter - Blue is stuck in the centre of the frame for a final touch


 +91 99676 55545