Liquid Embroidery Techniques By Pattie Wilkinson
Liquid Embroidery Techniques By Pattie Wilkinson
Let me introduce myself. I’m Pattie Wilkinson, and I have been enjoying crafts, making things, sewing, and painting on fabric, garments and articles for home decor for the past 20 years. As an experienced fabric painter, I have learned multiple techniques for applying fabric colours on all types of textile projects. Whether you are looking for techniques on painting or on tiny objects such a necklace or a simple t-shirt, right to the way to painting drapes for your home, there are dozens of ways to achieve beautiful results that you can be proud to say you painted it yourself!
What Is Liquid Embroidery

-
Dimensional paints / colours are referred to as Liquid Embroidery, puffy or 3-D outliners. Liquid Embroidery come in an array of shades and some include glitter in the shades. The most outstanding attribute of Fevicryl Liquid Embroidery is that they remain rounded and raised up on the fabric after drying. Another appealing aspect are the pointed tips of the bottles which allow you to draw distinct lines and borders with Fevicryl Liquid Embroidery. This feature enables you to create a stained glass effect, or an embroidered appearance without sewing with a needle and a thread. It is easy to draw graphic designs and lettering with Fevicryl Liquid Embroidery which squeezes directly out of the bottle through the small pointed tip. Beginners are less intimidated with Fevicryl Liquid Embroidery, so they are an obvious choice for kids and teens to begin experiencing the joys of decorating on fabric. Also, the numerous techniques that you can learn while using Fevicryl Liquid Embroidery makes it extremely enjoyable for the more experienced crafters and artists looking for a new way to express their artistic skills.
Techniques
-
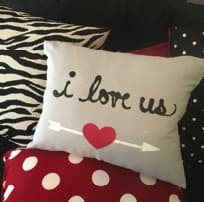
Lettering Technique – Draw letters directly onto the fabric with chalk. Trace lines with the tip of the Liquid Embroidery bottle. Let it dry overnight. Brush chalk lines away from the fabric.
-
Texture Technique – Apply Fevicryl Liquid Embroidery generously to create a solid design, such as a heart. While wet, press with textured objects such as bubble wrap, crumpled paper, or drag the tip of a fork through the Liquid Embroidery, to create textures and designs.
-
Mirror Technique – Fold the fabric in half. Press the folded edge with your fingers or an iron. Open the fabric and apply Fevicryl Liquid Embroidery in heavy graphic lines and designs on one side of the fold. While wet, fold the fabric back together. Press lightly with your fingers to flatten the Liquid Embroidery. Unfold the fabric to reveal a mirrored design.
-
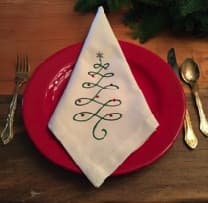
Embroidery Technique – Apply iron-on transfer for an embroidery design on the fabric. Trace lines with the tip of the Liquid Embroidery bottle. Let it dry for 72 hours. Wash out the iron-on transfer design.
-
-
Stained Glass Technique – Squeeze Fevicryl Liquid Embroidery around the edges of the design only. Let it dry. Apply fabric paint with a brush inside the Liquid Embroidery design.
-
Dot Technique – Achieve a pix elated design by squeezing dots of Fevicryl Liquid Embroidery to cover an entire design. Gradients of colour, or contrasting colours will create amazing effects.
-
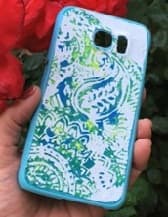
Paper Press Technique – Draw a graphic design with Fevicryl Liquid Embroidery. While wet, cover the entire design with a single sheet of paper. Press lightly with your fingers, then peel away paper to reveal a screen-printed effect.
-
Embedded Technique – Embed objects such as buttons, gems, rhinestones, charms, mirrors, and jewels into large dots of Fevicryl Liquid Embroidery to embellish a fabric. Squeeze a generous dot of Liquid Embroidery onto the fabric, then push the object into the Liquid Embroidery until the Liquid Embroidery comes up around the edges of the object.
-
Squeegee Technique – Fix the stencil to the fabric with a temporary adhesive. Squeeze a generous amount of contrasting colours of Fevicryl Liquid Embroidery inside the stencilled area. Use a squeegee or credit card to spread and swirl the Liquid Embroidery. Let the Liquid Embroidery dry, then remove the stencil.
-
Comb Technique – Squeeze a heavy line of Fevicryl Liquid Embroidery onto the fabric. Drag a comb through the Liquid Embroidery to create feathered lines and designs.
-
Palette Knife Technique – Squeeze Fevicryl Liquid Embroidery onto a disposable plate. Use a palette knife to apply Liquid Embroidery to the fabric, creating dimensions and blending the shades for an oil painted effect.
-
Beading Technique – Squeeze tiny dots of Fevicryl Liquid Embroidery in designs to resemble beads sewn onto fabric.
-
Non-Skid Technique – Apply Fevicryl Liquid Embroidery to create a non-skid surface, such as the bottoms of socks, bottoms of rugs, coasters, headbands, gloves, etc.
Tips
-
Before removing the cap, shake the bottle to force out air bubbles to the opposite end from the tip, to keep the Liquid Embroidery flowing evenly.
-
Use a straight pin to burst any bubbles that may appear while executing lines.
-
Store Fevicryl Liquid Embroidery upside down, to keep them ready for use.
-
Tap the Liquid Embroidery tip on a hard surface periodically while using, to force bubbles to the opposite end of the bottle.
-
Push a straight pin into the tip of the bottle to remove clogs.